Would you like to make this site your homepage? It's fast and easy...
Yes, Please make this my home page!
Differential Light Sensor
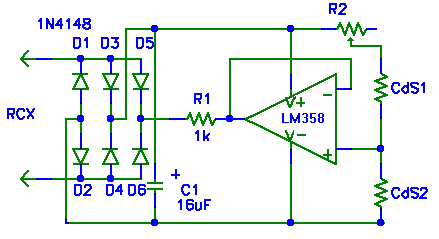
Schematic:

R2s value does not matter much but I would recommend 100W or more, but no less.
Construction:
- Build circuit on a 1" square circuit board. Position the variable resister so that it can be adjusted from one of the edges. Attach the CdS cells at the other end but not at the edge.
- Drill out two pins next to the center of one of the long sides of a Lego brick. Make four notches at the base of that same side for the CdS cell leads to come out. Remove all of the insides of the brick.
- Remove the top side of two other bricks.
- Solder two short 3/16 rods to wires that connect to the circuit where it is labeled RCX. Rods must be short enough to fit into the holes in the top brick and not touch the leads from the CdS cells.
- Insert rods into the holes to replace the pins. Glue into place with super glue or epoxy.
- Place end of board with CdS cells into the top block. Position cells into the notches and glue board into place.
- Slide the other two blocks over the board and glue them into place.
Implementing:
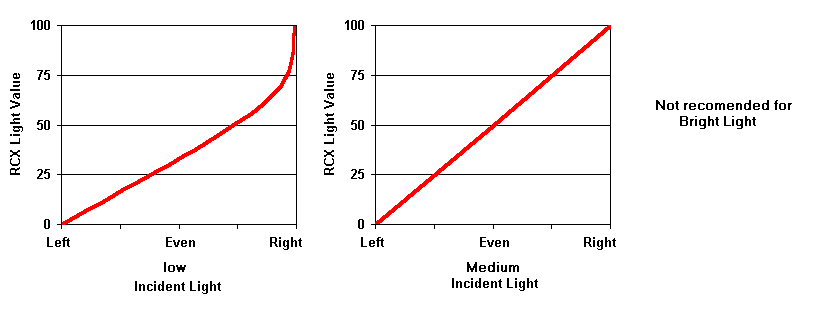
Plug this sensor into the RCX and set it for light. When one side has more light it will read high, when the other side has more light it will read low. Adjust the resister to get each side to react about the same way. You might want to adjust the angle of your cells or glue a piece of plastic between them to get it more directional.

The Sensor:
CdS cells are simply resisters that loose resistance as more light hits it. So you could make a light sensor that detects just light and dark by hooking up one cell directly to the RCX.

